About Agents
Easier integrations with Faraday Agents
Integrating systems is a challenging yet essential task in the lifecycle of any software product. Developers often encounter unfamiliar languages, undocumented APIs, or new paradigms when attempting to integrate with external tools. Consequently, many product teams opt not to offer integration capabilities.
In the case of Faraday, we recognize that seamless integrations with other security tools are crucial for our product. However, we realized that our existing Plugin system didn't provide the expected ease of use for developing integrations. It required a certain level of interactivity, such as executing commands from the console or importing a report, which made it cumbersome for periodic usage. Additionally, the reliance on our Python API posed difficulties for developers when integrating with tools that weren't programmed in Python.
To address this challenge, we made the decision to introduce the Agents feature in the latest release of Faraday (v3.9). Recognizing its significance as a core feature, we are thrilled to offer it in both the Community and commercial versions of our product.
Architecture

Overview of the Agents Feature
An Agent represents a process running continuously in a machine (not necessary the same running the Faraday Server). When a user decides to run an Agent (typically done through the Faraday Web UI), it will execute a code and send data back to a Workspace.

The image displayed showcases a workspace featuring several customized agents. These agents perform various tasks, such as utilizing nmap to discover hosts within the network, employing sublist3r to identify subdomains, and retrieving data from our services hosted on Heroku.
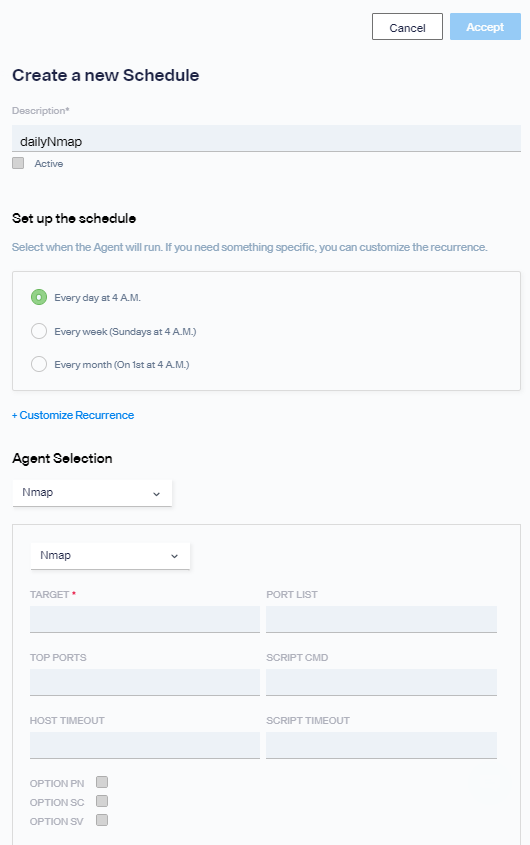
Beyond manually executing the agents using their respective "Run" buttons, it is also possible to schedule them for periodic execution. However, please note that this scheduling capability is exclusively available through the web interface for users of our Corporate version.
Now you can Run an Agent for a single use!


or with simple cronjobs if you are using the Community or Paid version.
Agents technical details
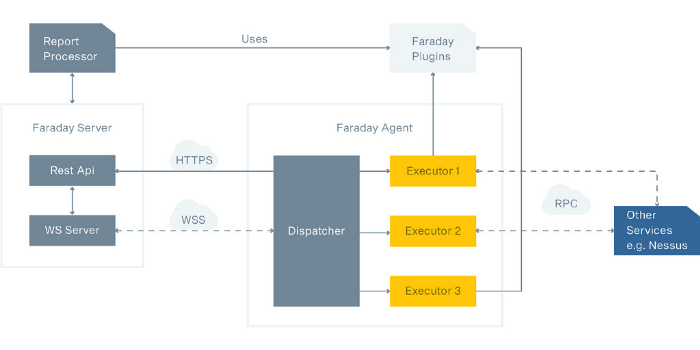
To simplify integrations with Faraday, we have developed the Faraday Agent Dispatcher. This project acts as a communication middleware between the Faraday Server and your custom agents.
To create integrations, you can build an Executor script that outputs data in JSON format to the standard output. This script handles tasks like retrieving host information, vulnerabilities, and more. The Dispatcher abstracts the complexities of APIs and communication protocols, allowing you to focus on generating the necessary JSON data. By leveraging the standard output for data transfer, the Dispatcher seamlessly handles the integration process. For further insight into the project's concept, you can refer to the explanation provided by one of our developers here.
This flexible approach enables you to employ a wide range of programming languages for your integrations. As long as the language supports standard output printing, you can develop agents in languages like Python, Bash, or even unconventional choices like Brainfuck.
We offer official executors that are pre-configured and require minimal setup. Alternatively, you have the option to create and execute custom executors tailored to your specific requirements. For detailed instructions on developing and running custom executors, refer to our custom executor documentation!
How to start using agents
Lets try with an example with TenableIO to check the Faraday Agents capabilities both as a custom executor, and run an official one.
Install Faraday Dispatcher
First of all you must install the Faraday Dispatcher inside the server you want to run the Agent on. You can do so running the following commands:
$ git clone https://github.com/infobyte/faraday_agent_dispatcher
$ git clone https://github.com/infobyte/faraday_agent_parameters_types
$ pip3 install faraday_agent_dispatcher
Configure your Agents and Executors
After the installation, you can setup the agent through the dispatcher config wizard. In this example, we will create an agent and assign a TenableIO executor to it. To do this, follow the next steps:
-Run the following command in your terminal:
$ faraday-dispatcher config-wizard
-Enter the letter A to configurate the agents:
~$ faraday-dispatcher config-wizard
Do you want to edit the [A]gent or the [E]xecutors? Do you want to [Q]uit? (A, E, Q) [Q]: A
-You will now be prompted to enter your server configurations and give your agent a name. In this case, we will use the default configurations and delete the agent token to demonstrate how to use the token to view your configured agents in the Faraday Automation tab:
faraday-dispatcher config-wizard
Do you want to edit the [A]gent or the [E]xecutors? Do you want to [Q]uit? (A, E, Q) [Q]: A
Section: server
host [localhost]: localhost
ssl [y/N]: N
api_port [5985]: 5985
websocket_port [5985]: 5985
Section: tokens
Delete agent token? [y/n]: y
Section: agent
agent_name [tenableio_agent]: new_tenable_io_agent
Do you want to edit the [A]gent or the [E]xecutors? Do you want to [Q]uit? (A, E, Q) [Q]:
-After this you can input the letter 'E' and then the letter 'A' to add your new executor. Give a name to your executor, and when asked if it's a custom executor, in this case we will pass the letter N because we are using an already defined executor. A list will show you the executors available, and you have to input the correct executor number, which in this case is number 20. Then, you'll be asked for the executor specific parameters. In this case, to add a tenableIO executor we need to provide the API keys and a pull interval value:
Do you want to edit the [A]gent or the [E]xecutors? Do you want to [Q]uit? (A, E, Q) [Q]: E
The current configured executors are: []
Do you want to [A]dd, [M]odify or [D]elete an executor? Do you want to [Q]uit? (A, M, D, Q) [Q]: A
Name: tenableio_executor
Is a custom executor? [y/N]: N
The executors are:
1: appscan
2: arachni
3: burp
4: codeql
5: crackmapexec
6: dependabot
7: github_secrets
8: gvm_openvas
9: insightvm
10: nessus
+: Next page
Q: Don't choose
Choose one: 20
2024-05-28 13:45:10,167 - faraday_agent_dispatcher - INFO {MainThread} [metadata_utils.py:70 - check_commands()]  Dependency check ended. Ready to go
Environment variable TENABLE_ACCESS_KEY value: ***********************
Environment variable TENABLE_SECRET_KEY value: ***********************
Environment variable TENABLE_PULL_INTERVAL value: 30
New repository executor added
The current configured executors are: ['tenableio_executor']
Do you want to [A]dd, [M]odify or [D]elete an executor? Do you want to [Q]uit? (A, M, D, Q) [Q]: Q
Do you want to edit the [A]gent or the [E]xecutors? Do you want to [Q]uit? (A, E, Q) [Q]: Q
-After passing your executor custom parameters, you have finished configuring your executor! Now you can input the letter 'Q' two times as shown to quit the config-wizard.
Note: Use the 'Q' input to quit the dispatcher, or it won't save the configurations.
Running the dispatcher
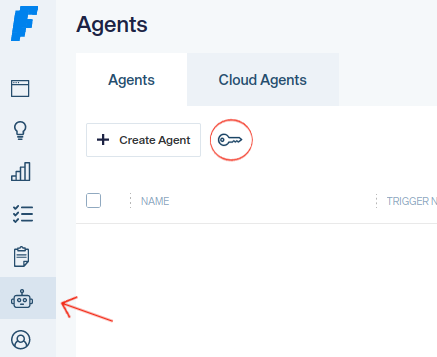
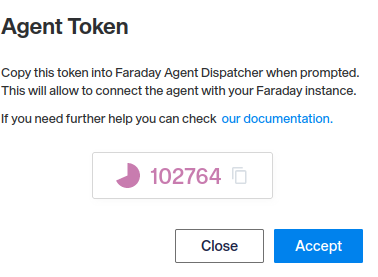
Before running the agent dispatcher, navigate to the Faraday Automation tab, and click the key-shaped icon to access the token needed to run the dispatcher:


Copy the given token and run the following command in your terminal:
faraday-dispatcher run --token {your_token_number}
$ faraday-dispatcher run --token 102764
2024-05-28 15:07:16,733 - faraday_agent_dispatcher - INFO {MainThread} [dispatcher_io.py:173 - register()]  token_registration_url: http://localhost:5985/_api/v3/agents
2024-05-28 15:07:16,830 - faraday_agent_dispatcher - INFO {MainThread} [dispatcher_io.py:213 - register()]  Registered successfully
2024-05-28 15:07:16,830 - faraday_agent_dispatcher - INFO {MainThread} [main.py:81 - main()]  Trying to connect to: http://localhost:5985
Now refresh your browser in the automation tab and you should be able to see your new agent with "online" status:

You have finished creating your agent! Now you can click the 'trigger now' button to run a scan depending on which agent you want to use. For specific documentation to run agents, check our Agent List documentation under the Agents tab.
What's Next
We are committed to enhancing the features and usability of Agents while continuously adding new executors to the Dispatcher repository. In upcoming releases, our focus will also be on providing select Agents with read access to their Workspace. This access will enable them to leverage existing data for uncovering more valuable information.
You can view all the agent available for use in the left panel, under the Agent list label.
We hope you enjoy this feature and find it useful!