Jira
This is a feature that allows you to send vulnerabilities from Faraday to JIRA. Through this process you will see how to
Jira Main Settings - authentication and connection
Start your Jira integration configuration in the Connection Settings tab on the Ticketing Tool /Jira section
First of all, edit your connection settings using the wide button. This will let you fill your url, key and generate a Public Key.
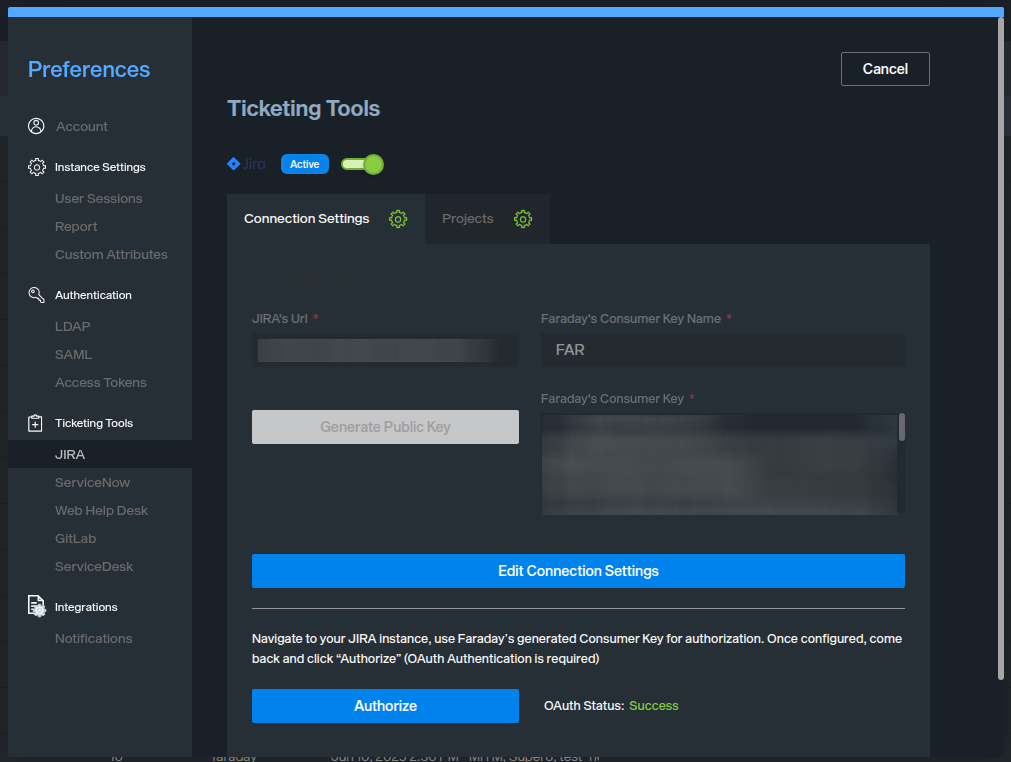
Copy your JIRA Instance URL and Jira Project Key information in the mandatory fields Jira Url and Faraday’s Consumer Key Name.
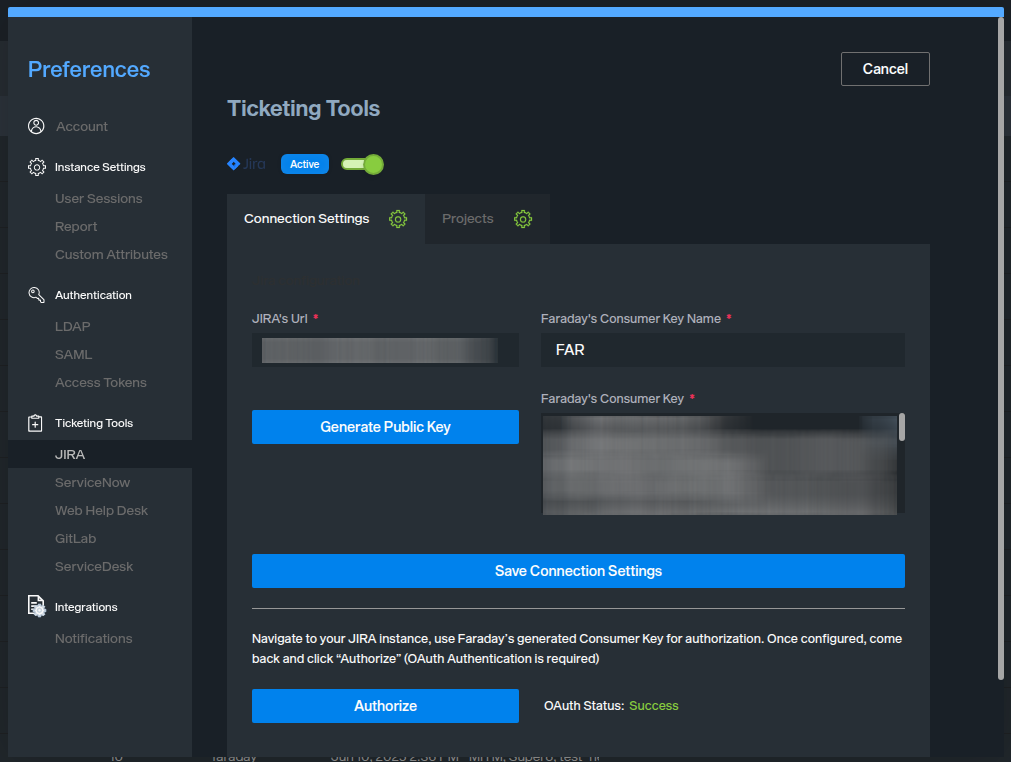
Then, generate a Public Key; it will appear in the Faraday’s Consumer Key field. Copy this value to the clipboard and save changes clicking on Save Connection Settings
In your Jira instance, you have to configure an Application Link. The following screenshots were taken from a Jira 8.13.8 version. You can use them as an example to configure your application link.

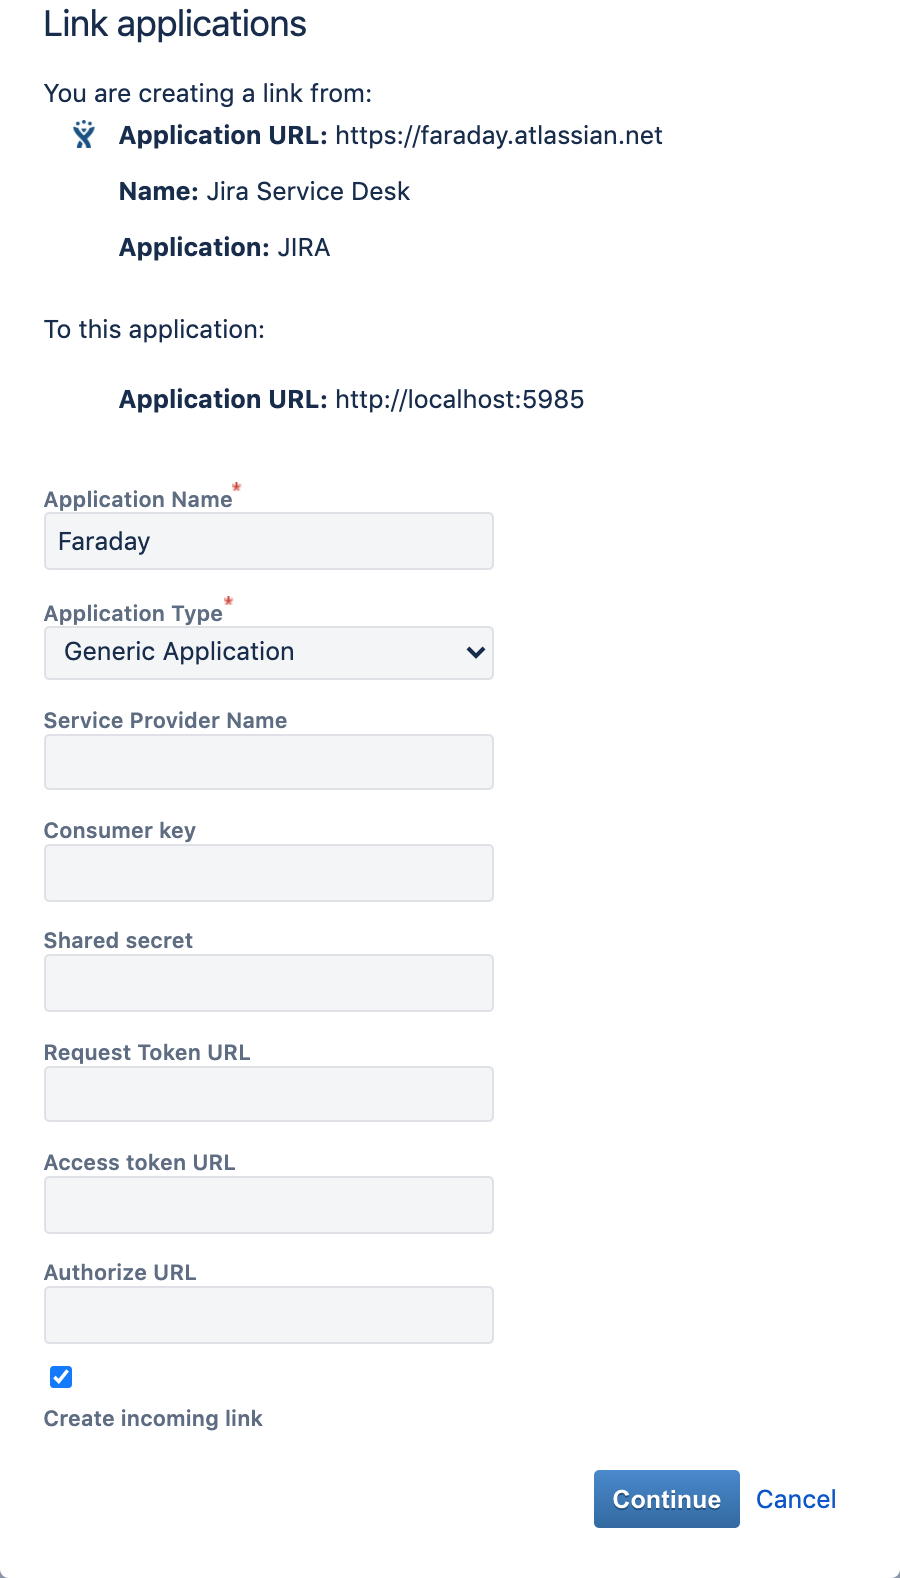
Jira Cloud Application link view example.
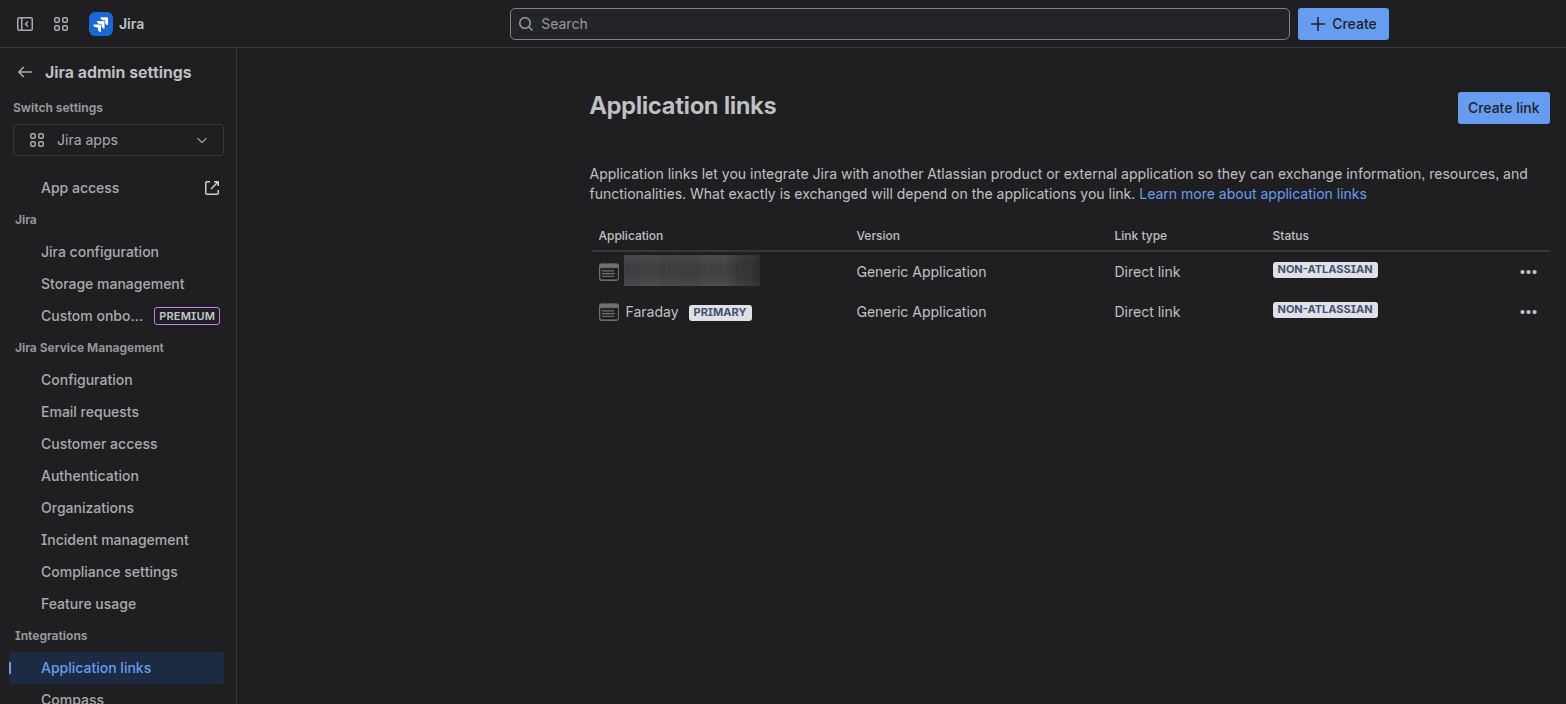
The application link configuration will look like the previous screenshot, assuming your Jira url is https://faraday.atlassian.net , your Faraday instance is located at http://localhost:5985 and you have pasted the previously obtained Faraday’s Consumer Key into the Public Key field.
After creating your application link, you are able to test your connection. To test the connection, go to your Ticketing Tools Jira configuration in Faraday and click on the Authorize button. If anything is wrong, you will receive a message like the following screenshot.
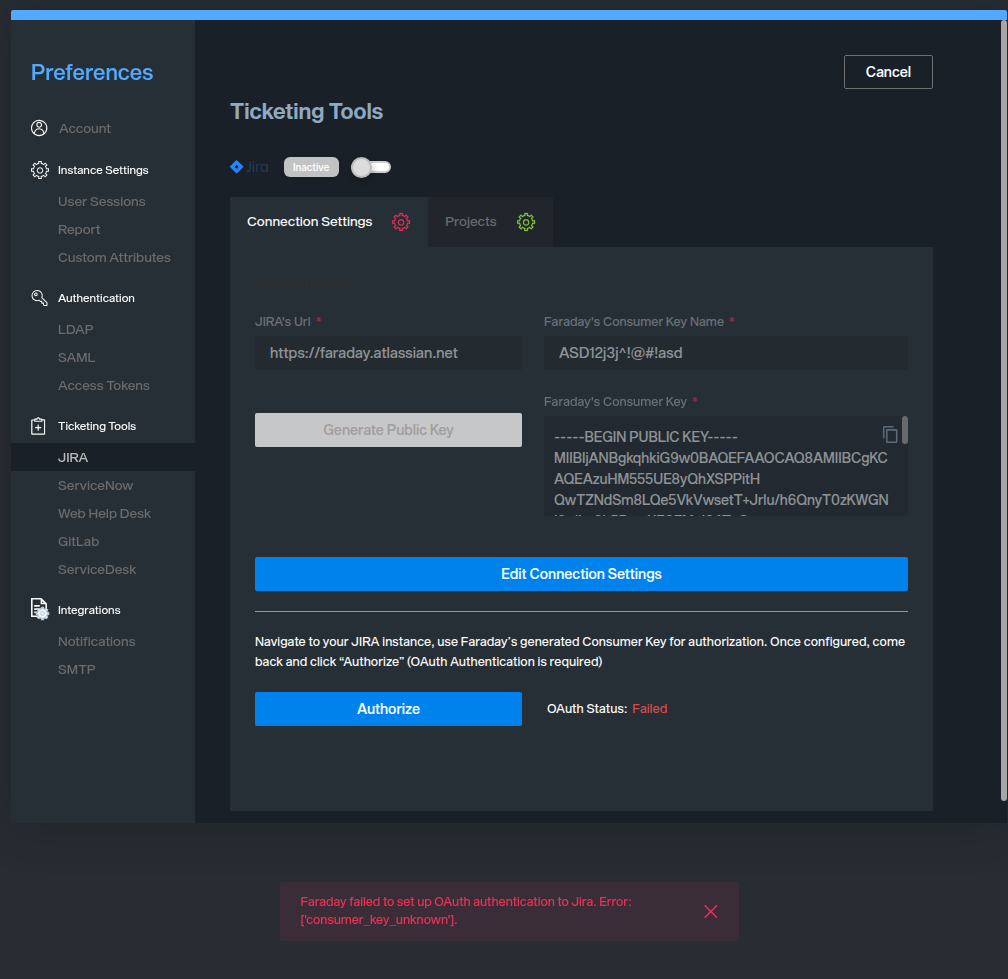
If your settings for both Faraday and Jira are correct, you will receive notification messages to confirm the connection between applications.
After you confirm and allow access to Faraday for reading and writing Jira data, the authorization will succeed. When this occurs, the red gear of the Connection Settings tab will turn green.
Project Configuration
At this point, you can configure one or more Jira projects to send to your Faraday vulnerabilities. To begin, navigate to the Projects tab in the configuration.
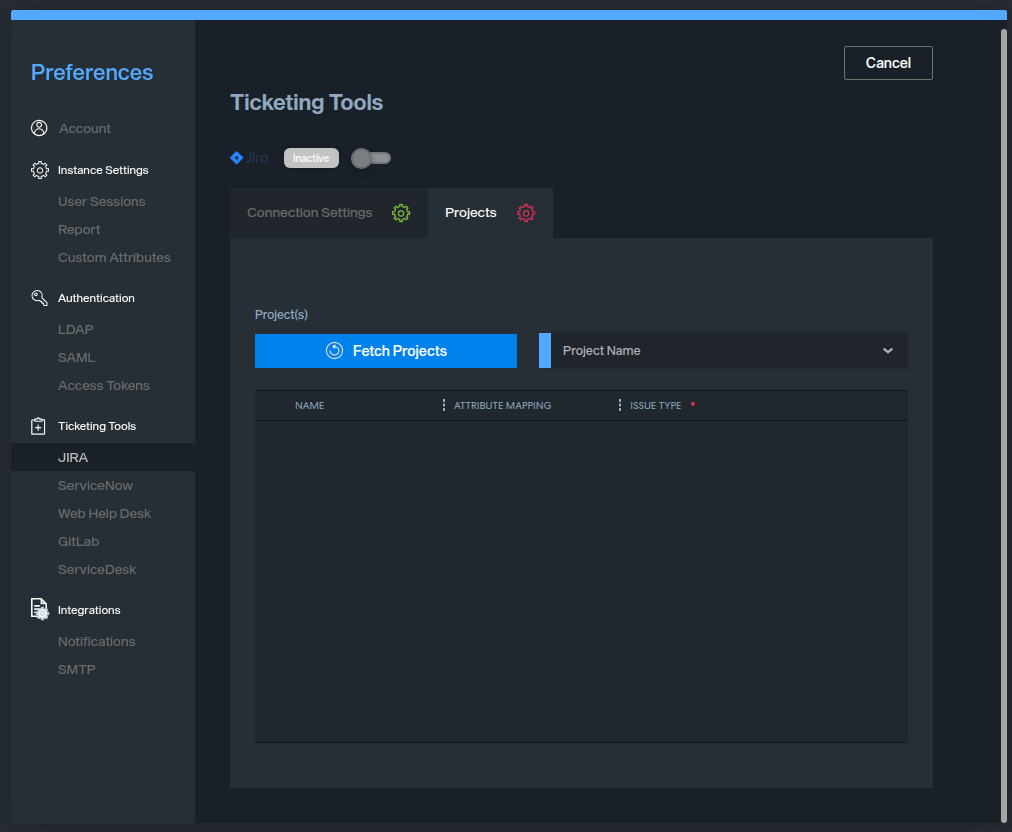
The steps covered in this documentation are divided into:
- Fetch into Faraday your Jira projects
- Choose the Jira projects you want to interact/integrate with Faraday
- Configure the mandatory and optional fields of the selected projects
- Configure the bidirectional matching of the Status field for each project
- Activate the project(s) already configured
-
Activate the integration
-
Fetch into Faraday your Jira projects
Fetch the projects associated with your established connection using the Fetch Projects button. The dropdown located to the right of this button will be populated with the names of all the projects in your Jira instance. This action may take some time; the Fetch Projects button will remain disabled until all project names have been fetched.
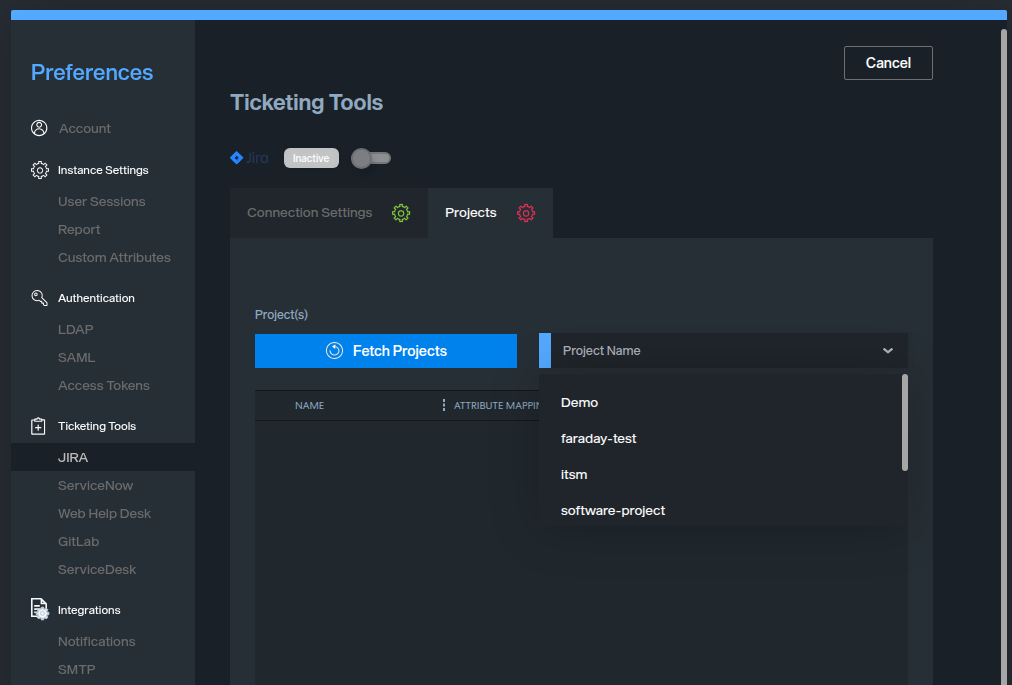
- Choose the Jira projects you want to interact/integrate with Faraday
From the previous dropdown, add the desired project(s) to the projects table for its configuration. Click on the project name to add it to the table.
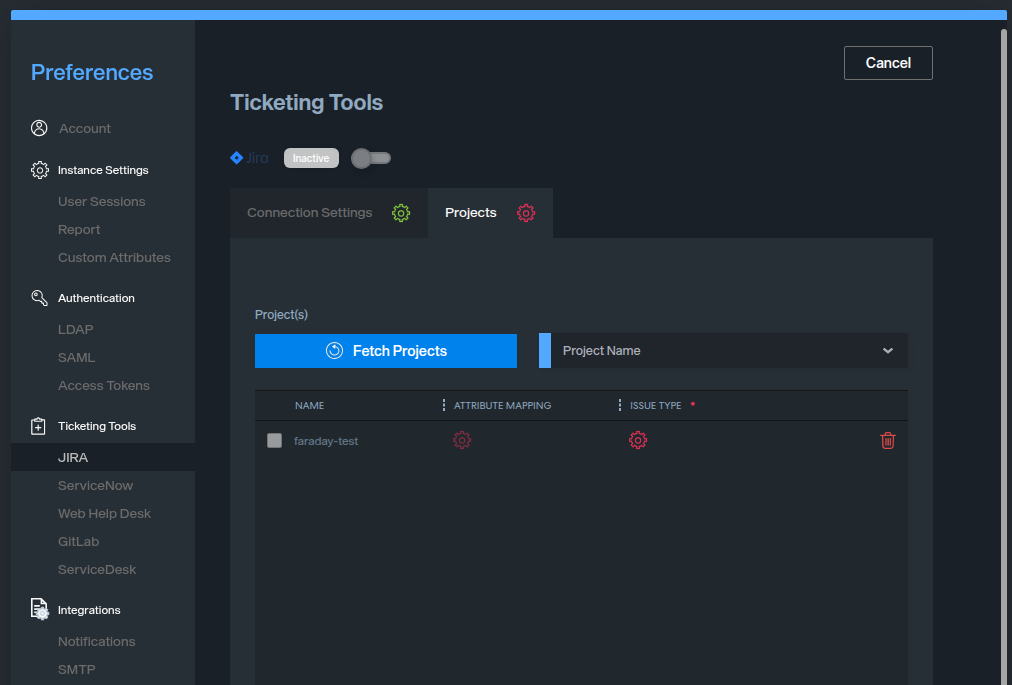
- Configure the mandatory and optional fields of the selected projects
Once the project is added to the table, one issue type must be selected and configured. To configure the project issue type, click on the red gear located in the issue type column.
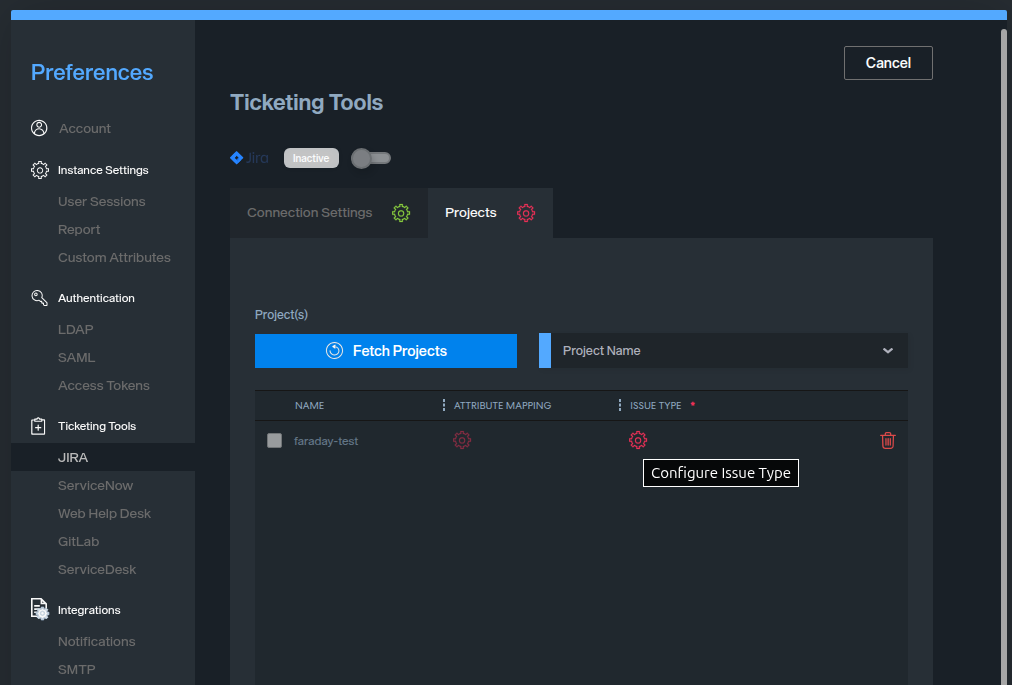
A new window with the Project’s Issue Type options will open. One issue type must be selected from the list.
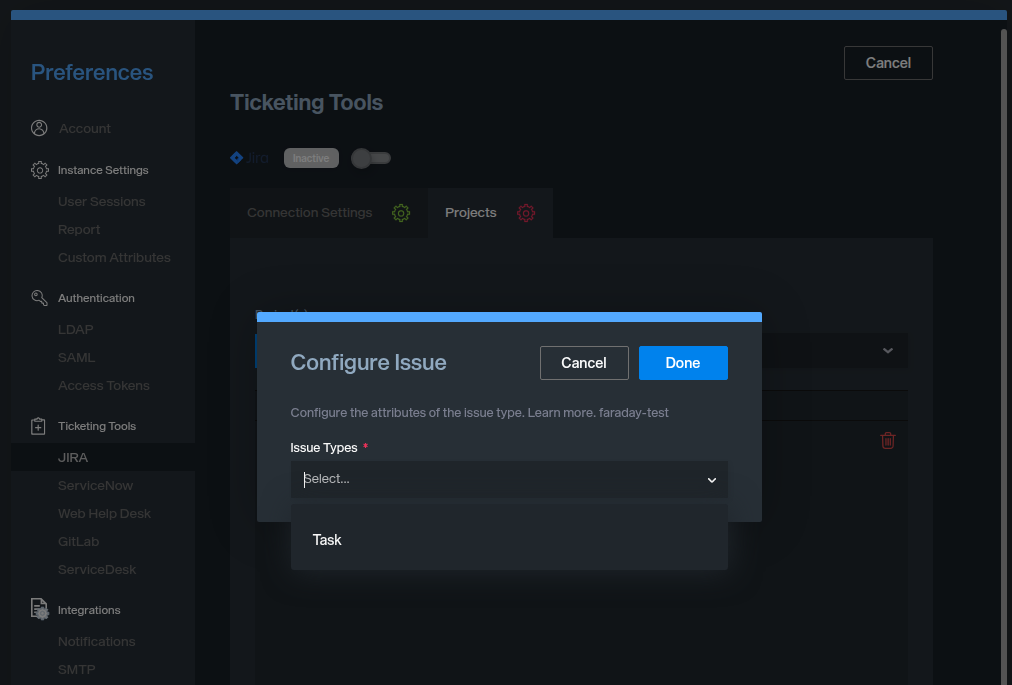
After selecting the issue type, you must configure the mandatory fields for it. This is needed for vulnerabilities to be correctly created in the target project.
The next step is to complete the configuration for the selected issue type. This configuration depends on the selected issue type. Mandatory fields are identified with a red asterisk and can't be empty to complete the configuration.
Optional fields can be added on demand to the configuration using the + symbol under the title Optional Issue Attributes.
Take into account that the values given to each of the fields (either mandatory or optional) are fixed values to be used when creating the ticket in Jira. Only the Summary and Description fields (mandatory for all issue types) can be defined using Jinja code using Faraday vulnerability fields as parameters.
- Configure the bidirectional matching of the Status field for each project.
The bidirectional configuration is optional; skipping it results in the Status field not being synchronized once sent to Jira.
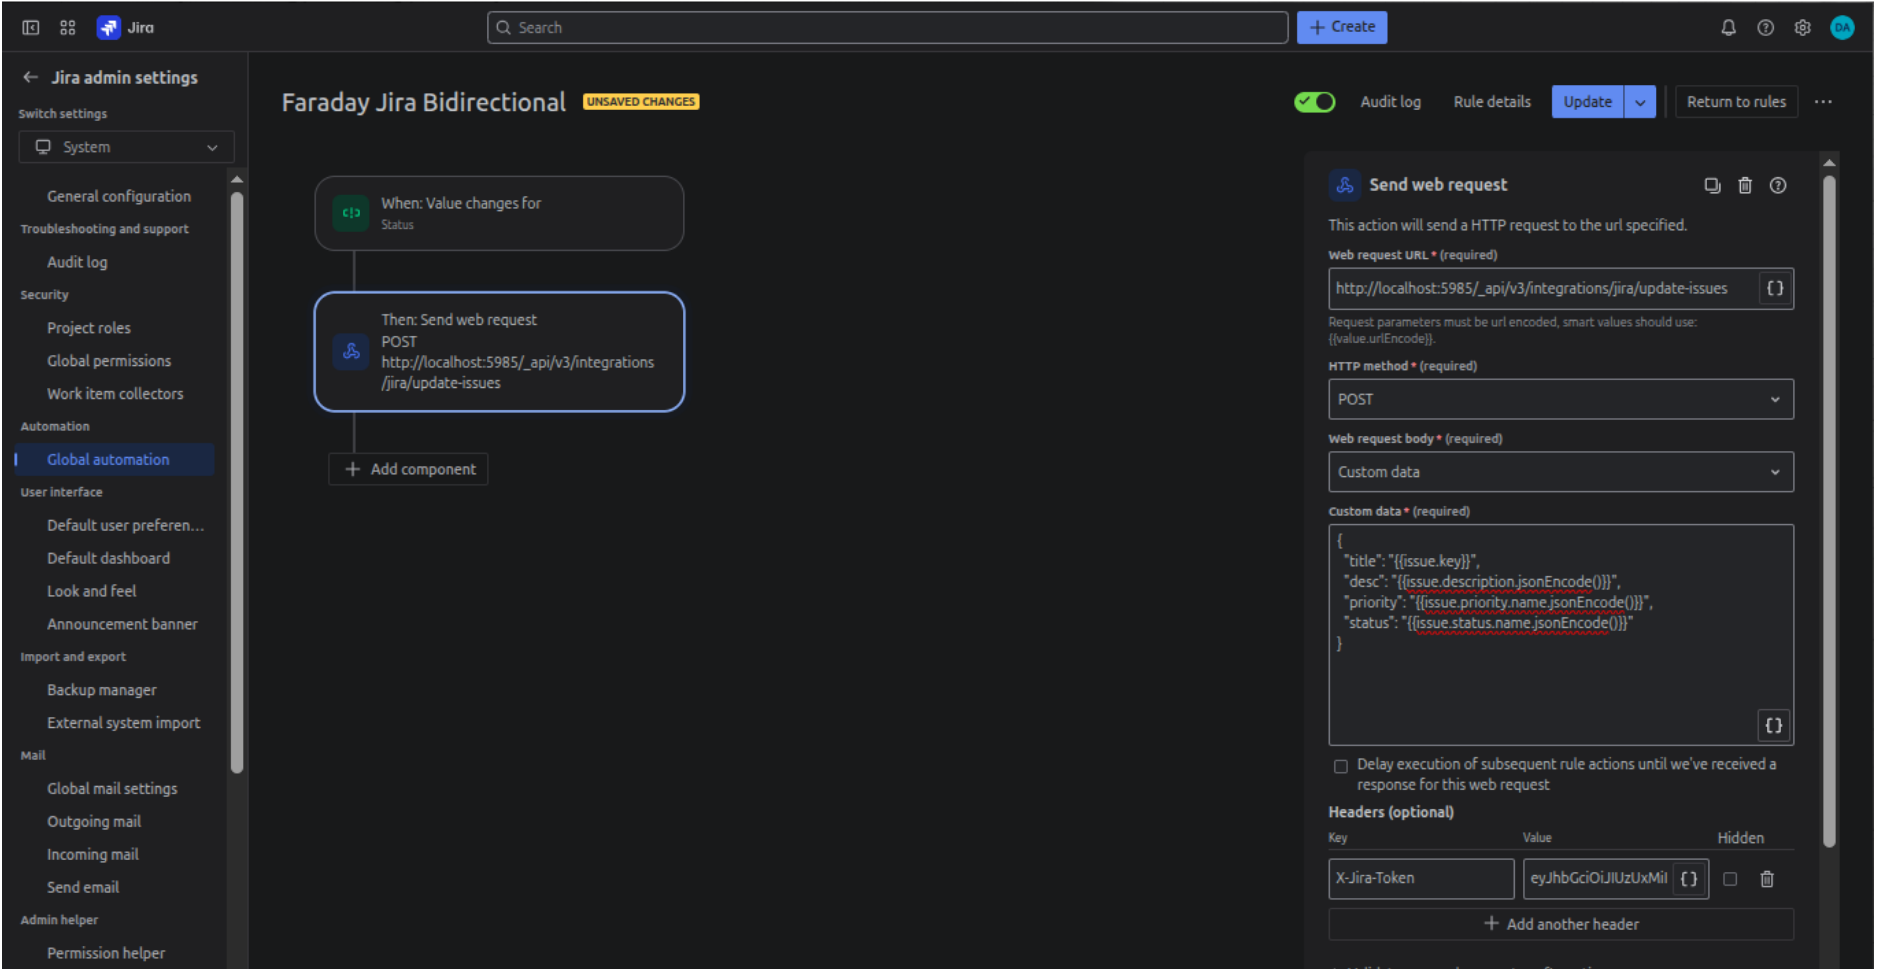
To use the bidirectional capabilities, it is necessary to first configure a global automation rule in your Jira System Settings. The rule trigger must be on any change of the Status field.
When creating the rule from scratch:
In the “When” part of the rule: - Add a Trigger: Field value changed - Fields to monitor for change: Status
In the “Then” part of the rule:
Select “Send Web Request” and fill the following fields:
- Web Request URL: http://localhost:5985/_api/v3/integrations/jira/update-issues (assuming your Faraday instance is located at http://localhost:5985/)
- HTTP method: POST
- Web request body: Custom data
- Custom data:
{
  "title": "{{issue.key}}",
  "desc": "{{issue.description.jsonEncode()}}",
  "priority": "{{issue.priority.name.jsonEncode()}}",
  "status": "{{issue.status.name.jsonEncode()}}"
}
Headers:
- Key: X-Jira-Token
- Value: you have to create a new access token in Faraday, using the scope “Jira”. Go to Preferences, Access tokens. Then click on Add Token, choose a name for your token and select the scope: Jira.
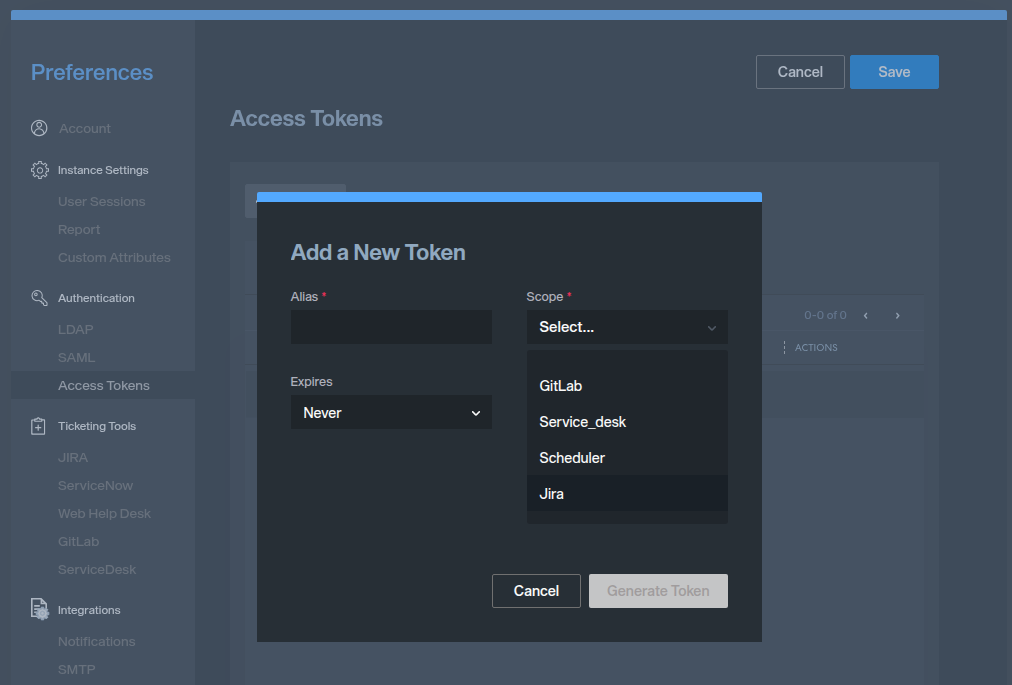
Copy the Token before closing the next window. Paste de value copied in the Value field.
Your rule should look like the following:
The last step is to activate the rule in your Jira instance (Enable it).
When your rule is created and enabled in Jira, you can finish the integration configuration in Faraday.
To configure the automatic synchronization of the Status field, click on the red gear located in the attribute mapping column.
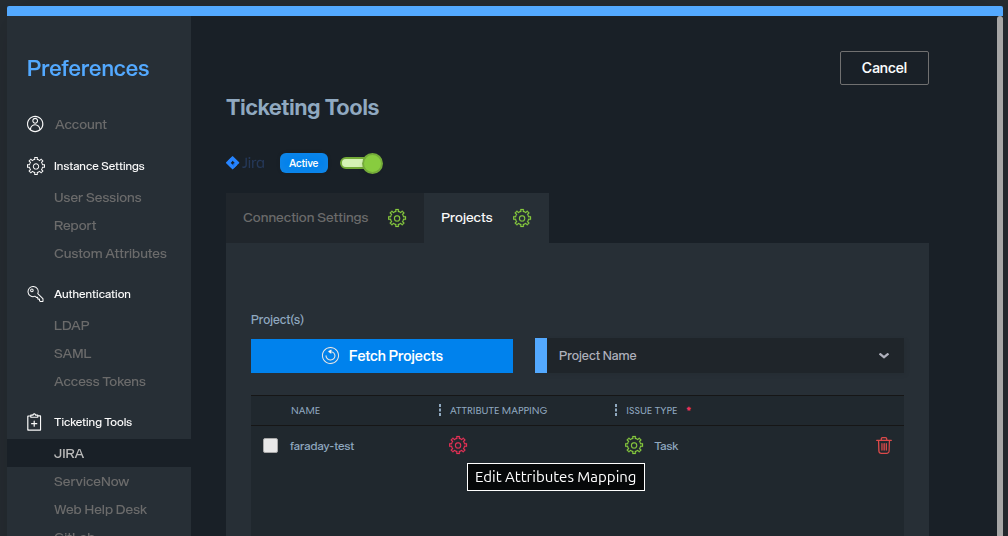
The attribute mapping is divided into two sections: Incoming and Outgoing.
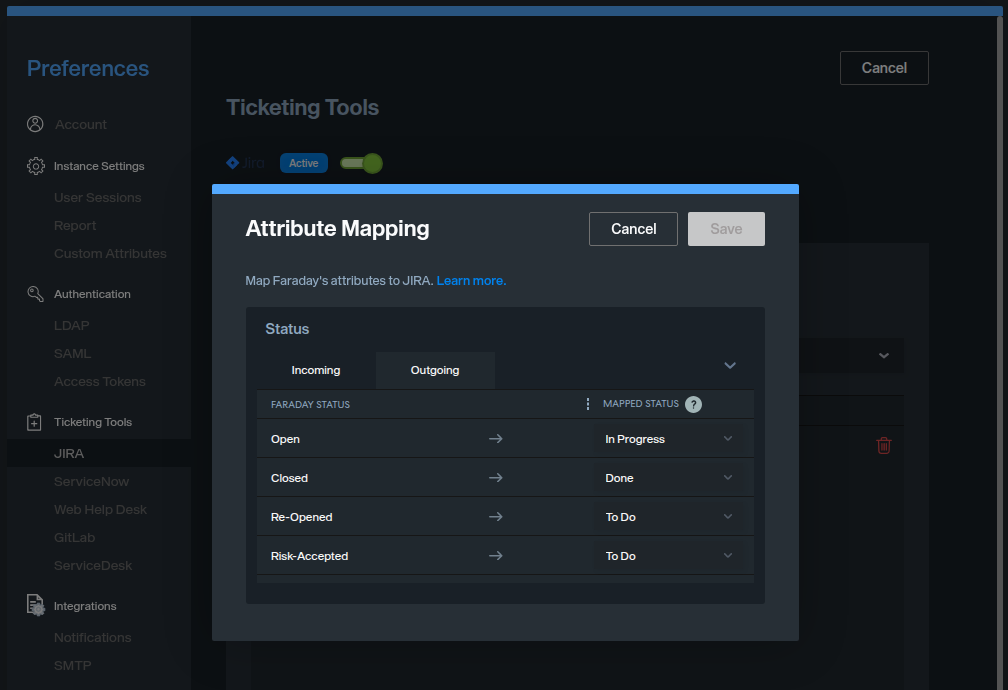
On the Outgoing tab, you can match the new status of the Jira ticket after a manual update, in Faraday, to any of the four possible statuses (open, closed, re-opened or risk accepted). The new Jira status is any of the possible Jira statuses for the project you are configuring. Once you select an option for some of the Faraday statuses (left column), an arrow will appear in the table with direction from left to right. Note: If the transition is not valid in Jira (because of a configured constraint), the synchronization will fail, and the issue in Jira won't be updated.
On the Incoming tab, you can match the new value for the status field (for a linked Faraday vulnerability), after a status transition occurs in Jira. The available statuses in Jira are the ones available in the project you are configuring. The available statuses in Faraday are: Open, Closed, Re-Opened or Risk Accepted. Once you select an option for some of the Faraday statuses (left column), an arrow will appear in the table with direction from right to left. Note: the Faraday status update, originated by this mapping, is not considered a manual update. This implies the update won't trigger another change in Jira.
- Activate the project(s) already configured
Once the Issue type is configured (gear icon becomes green), the project is ready to be activated. Clicking on the selection box located to the left of the row will activate the project. It can be multiple projects simultaneously activated. If the project is correctly configured, it is then able to be activated.
The red trash can located at the right of each row will delete the saved configuration for this project. This action can't be undone.
The gear icon in the Projects tab will turn green once you activate the first project. It becomes red again if you delete or deactivate the already activated projects.
- Activate the integration
If both the Connection Settings and Projects tabs are green, then you will be able to activate the integration.
To activate the integration, switch the slider located up left of the configuration panel.
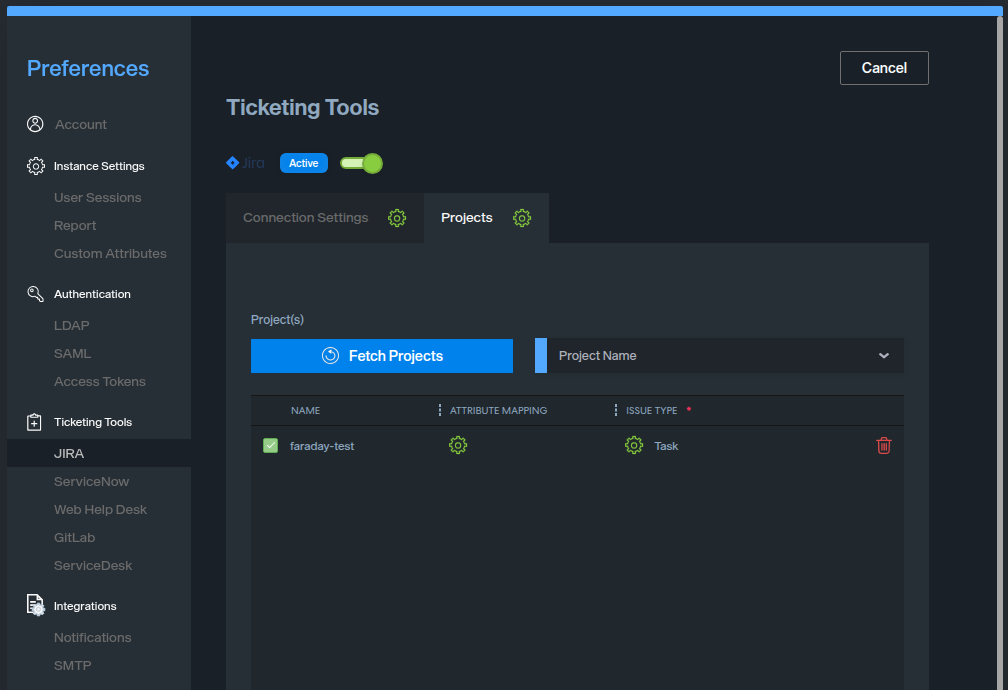
The integration will be automatically activated once you activate the first configured project. This action can be undone manually.
Send vulnerabilities to Jira
As in any other integration, you can send only confirmed vulnerabilities to your issue tracker. To send vulnerabilities to your configured projects you have to go to the Vulnerability Management section then Vulnerabilities tab (any context inside/outside workspace/asset), select the vulnerability(ies) and click on the context menu.
Because you are able to have more than one activated Jira projects, when you choose Jira, you will be prompted to select the project before sending the vulnerability(ies).

![]()
